
Case Study: Installation of a Custom 10mm Clear Toughened Glass Shower Panel in Erekala, Queensland
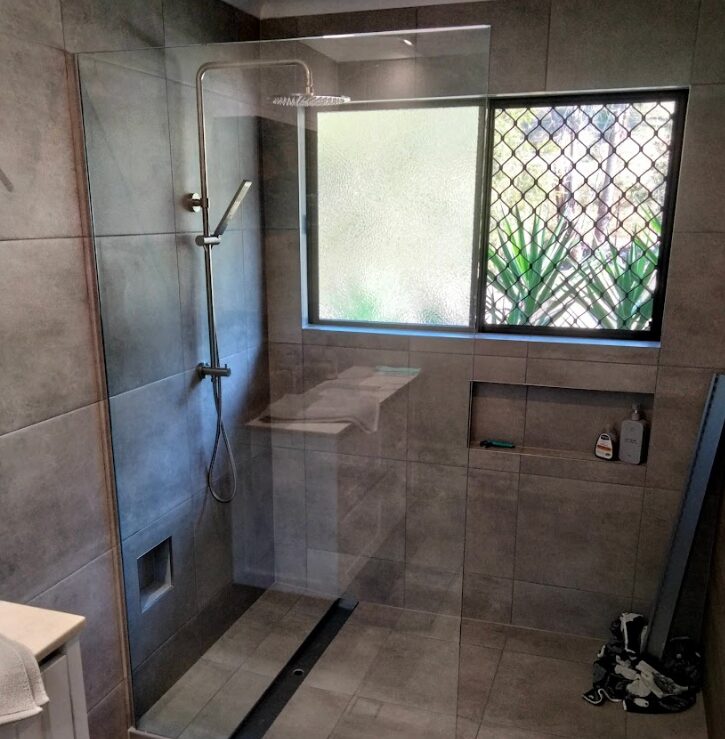
Russcos Glazing was engaged by a homeowner in Erekala, Queensland, to supply and install a custom 10mm clear toughened glass shower panel as part of a bathroom upgrade. The project required precision measurement, careful material selection, and expert installation techniques to deliver a modern, durable, and visually seamless shower enclosure.
The shower panel was manufactured to the exact size of 2005mm x 1060mm and installed using a clear anodised wall channel paired with an SB10 floor fitting, ensuring both stability and a sleek, minimal aesthetic. This case study outlines the process from initial assessment through to final installation and the outcomes achieved for the client.
The homeowner was in the process of modernising their bathroom and wanted a frameless-style fixed shower panel that would enhance the room’s openness while still providing reliable water containment. They approached Russcos Glazing for a solution that balanced strength, visual appeal, and long-term durability.
Given the bathroom layout, Russcos Glazing recommended a single-panel design crafted from 10mm toughened glass, a premium option known for its strength and crisp, minimalist look. The combination of a clear anodised wall channel and an SB10 floor fitting was chosen to provide secure support without detracting from the clean, frameless effect the client desired.
To ensure an accurate and seamless installation, Russcos Glazing conducted a detailed site inspection. This included:
The final glass dimensions, 2005mm x 1060mm, were selected to perfectly suit the available space while achieving the clean vertical and horizontal lines consistent with contemporary bathroom design.
The shower panel was custom-made from 10mm clear toughened safety glass, which is up to five times stronger than standard float glass. For this project, the glass was:
The decision to use clear toughened glass ensured maximum light flow throughout the bathroom while maintaining the streamlined, open feel that the client wanted.
Two key hardware elements were selected to secure the glass:
The wall channel provides discreet support and ensures the shower panel sits perfectly vertical. The clear anodised finish was chosen for its:
The channel also allowed for fine adjustments during the shower panel installation to achieve a perfectly plumb finish despite natural variations in the wall surface.
The SB10 fitting was used to anchor the base of the panel to the floor, offering:
Together, these components provided a stable and long-lasting installation while maintaining a sleek aesthetic.
Russcos Glazing followed a structured installation sequence to ensure precision and quality:
1. Preparation
The team cleaned the installation area, checked the floor fall, and marked fixing points. Protective sheets were used to safeguard tiles during drilling and fitting.
2. Installing the Wall Channel
The channel was aligned using a laser level to guarantee a straight, plumb installation. It was securely fixed using corrosion-resistant screws and anchors suitable for tiled surfaces.
3. Setting the SB10 Floor Fitting
The floor fitting was positioned to align perfectly with the wall channel, ensuring the panel would sit square and stable once installed.
4. Positioning the Shower Panel
The 10mm glass panel was carefully lifted into place by two technicians. The panel was seated first into the SB10 fitting and then guided into the wall channel, allowing for micro-adjustments.
5. Sealing
Premium bathroom-grade silicone was applied to the perimeter joints to ensure a watertight seal and to enhance structural stability.
6. Final Checks
The team verified alignment, stability, and silicone finishes to confirm the installation met Russcos Glazing’s high standards.
The finished result transformed the bathroom with a clean, modern shower enclosure that feels open and luxurious. The 10mm clear toughened glass enhances visual space, while the clear anodised hardware blends effortlessly with existing fixtures. The SB10 floor fitting and wall channel provide long-lasting structural support without affecting the minimalist look.
The homeowner was thrilled with the quality of workmanship and the professional approach taken by Russcos Glazing from initial consultation through to final installation.
This project demonstrates Russcos Glazing’s expertise in delivering precision-built, custom shower solutions. By combining high-quality materials, accurate measurements, and meticulous installation practices, the team successfully delivered a durable, visually striking shower panel that will serve the client well for years to come.
Project Details
Location – Erakala, QLD
Client – Residential
Task
Emergency Glazing and Glass Repairs
Weekends By Appointment
© 2023 Russco’s Glazing Services. All rights Reserved.
Website Designed and Built by Bright Light Marketing.